Pinterest

Follow Me on Pinterest

Monday, January 30, 2012

Baby Giraffe Hat and Diaper Cover - Newborn


Is this not adorable? I don't have a clue how to crochet but this sure makes me want to try! I don't even have any little ones (my son is six years old) but this is so precious I had to share! The link to where I found it is located below if you want more information:

Sunday, January 29, 2012

Valentine Tree - table decoration

This bling bling table decoration is assembled in less than 30 minutes and can be made with a string of white mini lights. Mine doesn't have lights - it will be in the center of my kitchen table and I would have no way to plug it in.


Supply list:
6 wire coat hangers (all the same size)
Handful of tie straps (your husband has some, trust me - just ask him)
2 strands of garland (6 feet each) of your choice

My coathangers are 16 inches long but you can use any size wire hanger as long as they are all the same length.

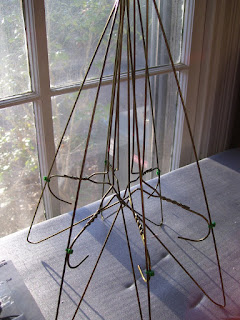
It is sorta difficult to explain how to put the coathangers together to form a tree. Take two coathangers and place them with the necks pointed towards each other. Then slide the neck (or rounded 'hook' part) towards long side of the other coathanger. Notice the right side of the picture above? Once you have it there, secure it with a tie strap. Repeat for the other side. You should have something that resembles a capital 'A'. Make 3 sets of these. Once you have your three sets, place them inside each other to form your tree. Secure at the very top with a tie strap through all six coathangers. Don't worry, it will flop around a bit but once all the garland is in place, it will stay. Clip all of the tails on your tie straps.


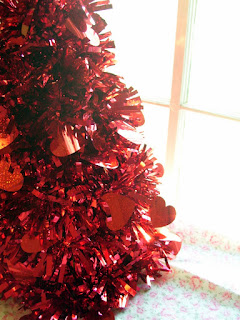
I chose red hearts as my garland - I purchased it at Walmart for a couple of dollars.


Beginning at the bottom, tie strap one end of your garland onto one 'leg' of your tree. Bring the garland around to the next leg of the tree and tie strap. Repeat until you have strapped garland to each coathanger leg at the bottom of the tree. Clip your tie straps and don't worry about the ones that show. You can fluff it up once are finished and it will be unnoticeable. Working your way up the tree, continue to wrap the garland around as you wind your way up to the top. Once you run out of the first strand of garland, tie strap the end. Start the new piece of garland on the same spot that you left off and tie strap it down. There are no additional tie straps needed until you get to the top - once there, secure the end with a tie strap and cut the garland that isn't needed. Make sure you leave enough garland to tuck it down into the tree and cover your coathangers and tie straps. You are done!


View from the top.

I couldn't resist the urge to take it outside and snap this picture.... all that green called for some red.
Posted by Picasa

Saturday, January 28, 2012

Huge Floor Pillows


Aren't these the most adorable floor pillows? You can find them in the Moda Bake Shop website under Home Decor. If I get brave enough to attempt to make them, I will post pictures.

Thursday, January 26, 2012

Strip Quilt Block

I first saw this pattern when I had just begun to quilt. It looked so complicated at the time. After I had gotten my feet wet and had a few quilts under my belt, I decided to try it. It is so very simple! I used a thick pink strip in the center of my block but you could adapt it to a thinner strip or forego it altogether and use a strip that blends with your other fabrics.

Sunday, January 22, 2012

Quilted pillowcase


Awhile back I purchased some of Moda's 'Scrap Bags' which are the remnants from the
production of their fabrics. They are strips similar to what you would find in a jellyroll.
I used several of these coupled with Kona white to make a quilted pillowcase. I bought
my Moda Scrap Bags at www.hancocks-paducah.com . It's a nice, inexpensive way to
get your hands on Moda fabric.
Posted by Picasa

Monday, January 16, 2012

Kitchen Towels from leftover flannel

These kitchen towels are easy to make and come together in no time. The design is very much like that of the Kindle cover (previous post) but is even less work! They are random patterns that don't even come close to making a 'matching set' of kitchen towels but they are useful for hand washing dishes, wiping sticky little fingers, cleaning counter tops, etc.

I had this scrap flannel and scrap terrycloth left over from the 'unpaper towel' Christmas gifts I made for my family this year. The pieces were oddly shaped and not one shape matched another.

Utilizing as much of the flannel I could, I cut the fabric and the terrycloth into a rectangle (or square, depending on how much fabric you have to work with). When you have your fabric and terrycloth the same size, lay them down right sides together.

Stitch around three sides, using a generous 1/4 inch seam. Leave one end open for turning. If you are a real stickler, you can clip the corners on the stitched ends to reduce the bulk and make your corners perfect. I didn't.

Turn the fabric right side out and fold down the open edge. It is best to fold down 1/2 inch here so when you topstitch over the opening, you will be sure to 'catch' the edges with your needle and thread.


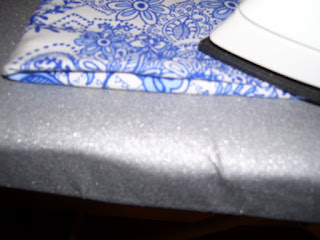
Next, press all of the seams down with an iron using steam. This creates a nice flat working surface and sets your folded down edge for easy stitching.


Once pressed, topstitch around all four sides of the towel, making sure to seal the opening you left for turning earlier. Two photos of topstitching isn't really necessary but I was sorta proud that I managed to get two shots this close up that turned out pretty decently. Please ignore all the junk lying on the table in the second photo.


Here is the front of one of the completed towels.

And a shot showing you the terrycloth side as well.

And here they are, all done and ready to use at some point in the future. Not tonight, I have more sewing to do.
Posted by Picasa

Sunday, January 15, 2012

Kindle Cover

Learn to make your own
Super cute Kindle cover - can be adapted for the Nook, Ipad, etc.

This Kindle cover will fit the 1st and 2nd generation Kindle. It is a simple design and can be modified to fit any size reader or Ipad. First, choose the fabric you want your cover made of. You can use different fabrics for the inside and outside of the cover but for this tutorial, I used the same for inside and outside.

Cut two rectangles from your fabric that measure 9 1/2 inches by 14 1/2 inches. Also, cut a piece of batting the same size. In the past, I have used two pieces of batting - one that is basted to the fabric that will be the inside of the cover you are making and one that will be basted to the fabric that will be the outside. But, with two pieces of batting, it becomes too much bulk to fit under the presser foot and the commotion caused by trying to shove it under while preventing my finger from getting snagged is just too much excitement for me. I stick with one piece of batting. I used Warm and Natural 100% cotton.

Grab a can of quilt basting spray. This isn't absolutely essential but will make things go a little smoother when you join the inside and outside fabric. You could pin it, I suppose. I despise anything that requires pinning, so I go the easy (lazy) route. Baste the batting to the wrong side of either the inside fabric or the outside fabric. It makes absolutely no difference whether you choose the inside or outside fabric.

When you have basted it, you will have something that looks like this.

Place your two pieces of fabric right sides together. One piece will have the batting you just basted on. Stitch along both long sides and one short side, using 1/4 inch seam. Leave one short side open for turning.

You should have something that looks like this.

Turn it inside out so the right sides of your fabric are showing on the outside.

Press the opening by folding 1/4 inch or so under on the open side. It takes serious talent to take a picture while ironing.
Topstitch the opening closed with a 1/4 inch seam, making sure to catch both layers of fabric that you pressed. You can do with with a decorative stitch but I was in a hurry so just plain old topstitch for me.

At this point, you have basically enclosed a piece (or two pieces if you are brave) of batting between two layers of fabric and sealed up all the edges. If you want to quilt your cover, now is the time to do that. I didn't quilt mine. Place the Kindle in the center the fabric and fold it over to get an idea of how deep you want the pocket. Once you have determined where you will begin sewing, you can mark it or pin it. I didn't do either - I just kept my place as I moved it over to the machine.

Using a 1/4 inch seam (the 1/4 inch part is pretty important here because if you use more than 1/4 inch, your Kindle may not fit in the pocket), top stitch the flap down on one side and then on the other side.

You have a pocket to put the Kindle in and a flap to cover it up with. I wanted to be able to fully close my Kindle cover so I am adding a snap. Besides, I will come up with any excuse in the world to add a snap to something because I am in love with my snap pliers. I mean, who wouldn't love this thing?

My snap pliers, the snaps and the awl. Isn't it beautiful? If you don't have snap pliers, you can buy the metal snaps at any craft/fabric store and most Wal-Mart type stores. Most of the packages come with the tool required to attach that type of snap. Or, if you don't want to do that, you can attach a button to the lower part of the front of the cover and add some type of loop (elastic) to attach to the button. You would need to take about an inch of the seam out of the upper part of the front cover so that you can insert some elastic (a pony tail holder works beautifully) with enough sticking out to reach the button. Once you have inserted the elastic, you would reclose the seam with topstitch. But, I am adding a snap, so on we go.

Eyeball it and determine the center for placement of your snap. If you are really particular and eyeballing it won't work for you, grab a tape measure and mathematically determine the exact center. But, I have made alot of these and I promise, eyeballing it works just fine.

Using the awl, score your fabric for placement of the snap on the flap of the cover. Place snap.

I know it's difficult to see but there is a snap behind my finger and the pencil. Using the snap on the flap as a guide, mark the fabric in the pocket for placement of the bottom snap. Use the awl to score the fabric on the pocket and then place snap.

Insert Kindle into finished product and ....

Snap closed.

And then take pictures and blog it.
Posted by Picasa

Kindle Cover


This is a twenty minute Kindle cover. The part that takes the most time, literally, is cutting. I will make another one tonight and post a photo tutorial to show you how to make your own!