
Tuesday, July 3, 2018
Wednesday, June 28, 2017
Pure Leaf Tea review

I like to drink tea...alot. Most bottled teas have an artificial taste and some have an overpowering lemon flavor. I like very simple tea that tastes like tea and that is what you get with Pure Leaf. It doesn't taste full of chemicals and overprocessed. It tastes like tea tastes if you make it at home with teabags and boiling water. I know Pure Leaf also has dried tea leaves you can purchase as well but I haven't tried them yet.
Although the sample was free, the opinion is purely my own and not influenced by the free sample.


Monday, June 26, 2017
Mommy and Me purses now available!
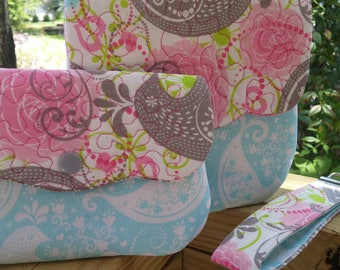
Browse unique items from Sehosas on Etsy, a global marketplace of handmade, vintage and creative goods.
http://www.sehosas.com
Saturday, June 10, 2017
Make Your Own Small Purse

Monday, January 23, 2017
Monday, September 12, 2016
Snowballs!
I've started early on Christmas projects this year. I'm preparing for a local craft show in early November. These personalized snowballs make a great teachers gift, children love them and you can use them to have an indoor snowball fight!


Monday, September 5, 2016
Journey to a Successful Etsy Shop - Part 3
If you haven't read Part 1 and Part 2 - please view the earlier posts on the blog.
Because my Facebook, Google Adwords and Etsy promotions had all failed, I decided to take the advice I had read about in my research: capture repeat customers by allowing them to sign up for a newsletter once they have visited your site. It sounded easy and harmless enough so I decided to give it a go.
Newsletter with Mailchimp
I signed up for a free account with Mailchimp which allows you to establish a form that will allow customers to sign up for your store's newsletter. I consider myself relatively computer savvy and I can assure you that Mailchimp is not for the faint of heart. It's almost as bad as Google Adwords. It's just not user friendly for those of us navigating the terrain for the first time. Long story short, you set up a form that customers can fill out with their email address and it is then emailed to you to be added to your 'list'. When you sent out a newsletter, you send it to everyone on your list. Sounds good, right? Except you can't use any old email address for your customers information to be mailed to. The free ones: @aol @gmail and @yahoo won't allow the emails to come through so you are expected to have your own business email. For example: info@sehosas.com. To do this, you have to have your own domain name. So, I spent $12 and bought www.sehosas.com. But adding email capability to this costs more so I signed up for an email address for $5/month. I used the templates and set up a Welcome email to be sent to my customers once they signed up for the newsletter. However, I can't figure out how to create a clickable link in Etsy to allow customers to easily click on the link and sign up for the newsletter. Instead of seeing Sign up for Sehosas Newsletter, they see http://eepurl.com/cd_oG1. Let's be real here - that's not pretty and doesn't entice anyone to manually copy and paste the link into a new window. To date, I have had 0 people sign up for my newsletter.
Pinterest
I have a Pinterest page with several followers and often post my items on Pinterest and that does garner a sale here and there. It's relatively simple to do and doesn't cost anything so it's a winner in my book.
I haven't given up on promoting my Etsy store and will continue reporting on the things I try and do or do not have success with. Clearly it can be done as there are thousands of successful Etsy stores out there. I just haven't found the right way to get the word out about mine.
Sehosas on Etsy
Because my Facebook, Google Adwords and Etsy promotions had all failed, I decided to take the advice I had read about in my research: capture repeat customers by allowing them to sign up for a newsletter once they have visited your site. It sounded easy and harmless enough so I decided to give it a go.
Newsletter with Mailchimp
I signed up for a free account with Mailchimp which allows you to establish a form that will allow customers to sign up for your store's newsletter. I consider myself relatively computer savvy and I can assure you that Mailchimp is not for the faint of heart. It's almost as bad as Google Adwords. It's just not user friendly for those of us navigating the terrain for the first time. Long story short, you set up a form that customers can fill out with their email address and it is then emailed to you to be added to your 'list'. When you sent out a newsletter, you send it to everyone on your list. Sounds good, right? Except you can't use any old email address for your customers information to be mailed to. The free ones: @aol @gmail and @yahoo won't allow the emails to come through so you are expected to have your own business email. For example: info@sehosas.com. To do this, you have to have your own domain name. So, I spent $12 and bought www.sehosas.com. But adding email capability to this costs more so I signed up for an email address for $5/month. I used the templates and set up a Welcome email to be sent to my customers once they signed up for the newsletter. However, I can't figure out how to create a clickable link in Etsy to allow customers to easily click on the link and sign up for the newsletter. Instead of seeing Sign up for Sehosas Newsletter, they see http://eepurl.com/cd_oG1. Let's be real here - that's not pretty and doesn't entice anyone to manually copy and paste the link into a new window. To date, I have had 0 people sign up for my newsletter.
I have a Pinterest page with several followers and often post my items on Pinterest and that does garner a sale here and there. It's relatively simple to do and doesn't cost anything so it's a winner in my book.
I haven't given up on promoting my Etsy store and will continue reporting on the things I try and do or do not have success with. Clearly it can be done as there are thousands of successful Etsy stores out there. I just haven't found the right way to get the word out about mine.
Sehosas on Etsy
Sunday, September 4, 2016
Journey to a Successful Etsy Shop - Part 2
If you haven't read Part 1 of this post, you can read it here: Journey to a Successful Etsy Shop - Part 1
Google Adwords
After failing at promoting my Facebook page, I decided to jump right in with Google Adwords. To be succinct, it is rocket science. It is a plethora of jargon, acronyms and terms that I had not encountered in my daily life. And it wasn't something I could learn on the fly and in a hurry. Still, that didn't deter me. I plopped down another $50 or so for a text ad (you set a daily budget and I had determined to spend a whopping $1/day). I spent an afternoon searching keywords that I thought would entice people to my Etsy store. I set up my Campaign and then my Ad and I was set to go. 77 impressions and 3 clicks later, I still had no sales. Impressions are the number of times your ad is shown and clicks are the number of times someone actually clicked on the ad. I was still having no success.
To add more salt to my wound, Google Adwords informed me that my budget was too low to drive traffic to my site and they were only able to show my ad periodically throughout the day so as not to go over my $1/day budget early in the day. So, I upped the ante and changed my budget to $3/day and I changed some of my keywords. A few more impressions and 2 additional clicks and still no sales. I was getting nowhere in a hurry and throwing money away to boot. And Google kept yelling that my budget was too low.
Etsy
For those of you familiar with Etsy, you know that you can promote your items on Etsy (similar to Google Adwords but the promotion is only within Etsy). I began to promote my items using Etsy's promotion tools. Basically, you set a budget per day and then determine which items you want to promote. You can automate the bid or set it manually. I chose to promote three items from my store and manually set the bid. I set it higher than the automated bid in hopes that my ad would show ahead of another store that was selling similar items. I spent $23 on advertising and made one sale - totaling $24 including shipping. I was still in the red even though I had made a sale.
I still wasn't willing to give up. I decided to try creating a newsletter to send to the few people that were coming to my Etsy shop. More on that in the next post....
Sign Up - Sehosas Newsletter
Google Adwords
After failing at promoting my Facebook page, I decided to jump right in with Google Adwords. To be succinct, it is rocket science. It is a plethora of jargon, acronyms and terms that I had not encountered in my daily life. And it wasn't something I could learn on the fly and in a hurry. Still, that didn't deter me. I plopped down another $50 or so for a text ad (you set a daily budget and I had determined to spend a whopping $1/day). I spent an afternoon searching keywords that I thought would entice people to my Etsy store. I set up my Campaign and then my Ad and I was set to go. 77 impressions and 3 clicks later, I still had no sales. Impressions are the number of times your ad is shown and clicks are the number of times someone actually clicked on the ad. I was still having no success.
To add more salt to my wound, Google Adwords informed me that my budget was too low to drive traffic to my site and they were only able to show my ad periodically throughout the day so as not to go over my $1/day budget early in the day. So, I upped the ante and changed my budget to $3/day and I changed some of my keywords. A few more impressions and 2 additional clicks and still no sales. I was getting nowhere in a hurry and throwing money away to boot. And Google kept yelling that my budget was too low.
Etsy
For those of you familiar with Etsy, you know that you can promote your items on Etsy (similar to Google Adwords but the promotion is only within Etsy). I began to promote my items using Etsy's promotion tools. Basically, you set a budget per day and then determine which items you want to promote. You can automate the bid or set it manually. I chose to promote three items from my store and manually set the bid. I set it higher than the automated bid in hopes that my ad would show ahead of another store that was selling similar items. I spent $23 on advertising and made one sale - totaling $24 including shipping. I was still in the red even though I had made a sale.
I still wasn't willing to give up. I decided to try creating a newsletter to send to the few people that were coming to my Etsy shop. More on that in the next post....
Sign Up - Sehosas Newsletter
Saturday, September 3, 2016
Journey to a Successful Etsy Shop - Part 1
Becoming successful on Etsy is not easy. Initially, I set up my shop so I could make a little money to 'feed the habit' of my sewing and embroidering hobbies. It didn't much matter to me that I only garnered a handful of sales the first year. Or the second year.

Recently though, I decided to put more effort into building a brand and business. I wanted to drive traffic to my store and began researching the best way to do that. There are literally thousands of articles written about how to drive more business to your website/store. Let me sum it up for you - it's not easy. Or cheap. Or quick. No matter what they tell you.
What I Started With - Facebook
I started with Facebook. My Facebook page for my business is Sehosas Facebook Page. I had a few likes on the page when I began my journey to success - around 15. For those of you not familiar - there is a difference in 'post' likes and 'page' likes. With my newfound desire to make my shop successful, I started by posting photos on Facebook of some items in my Etsy shop. I had a few post likes but no page likes from my efforts. In essence, nothing happened. No sales were generated from my efforts.
Then I learned that I could promote my page by having Facebook advertise it. So, $30 later I had promoted my page and garnered about another 15 page likes. I was up to 30 page likes. In essence, nothing happened. No sales were generated from my efforts.
I decided to try boosting posts instead of promoting my page. Another $50 and Facebook had shown a few of my posts to roughly 2,000 people. I had about 50 post likes and another 10 page likes. I even promoted a giveaway and got 1 share and 3 comments (one was my own). Again, nothing had really happened and there were no sales.
While $80 isn't a huge amount of money, it's more than I would flush down the toilet. Which is what I felt like happened with my Facebook endeavor.
In the next post, I will review the next step I took - Google Adwords.
Friday, September 2, 2016
Thursday, September 1, 2016
Monday, April 20, 2015

Monday, April 13, 2015
Monogrammed tube top
This shirt (or skirt depending on how you want to wear it) stitches up in a hurry. It is simply the bottom of a men's tee shirt with several rows of smocking at the top. Add a monogram and you have a cute tube top. Straps could be added easily but I like having the option of wearing it as a skirt. If there is enough interest, I will add a tutorial on how to make your own. Disclaimer: the embroidery is a little sloppy here...my new machine and I are just becoming acquainted and had some growing pains! Lol.

Wednesday, March 19, 2014
Monday, March 11, 2013
Help my little one win a handicap accessible van!


My son is a warrior. He's only seven years old but he has battle scars from nine brain surgeries, multiple seizures and numerous hospital stays (two of them were over three months long). He smiles easily, laughs with his whole body and loves with his heart and soul. I have entered him into a contest and need your vote. You see, he is wheelchair bound and it's not easy sporting around town (or anywhere else) with a child in a wheelchair without a handicap accessible van. The most votes win so please vote today and every day until the end of the contest. You can vote here: VOTE FOR SAMMY You may have to hold down the Ctrl while clicking on the link. Please feel free to share the link with anyone and everyone! Post it, publish it, pass it out freely! Thank you!
Wednesday, July 11, 2012
I have been searching all over for fabric to make curtains for my dining room. Yes, I have lived in my house for eight years and am just now getting around to putting up some curtains. I found this 'you have to buy this' fabric at Joann's.

 My dining room has all of the colors in this fabric and the pattern matches with the rug already in the room. I paid $35 including tax for 6 1/2 yards - I had a coupon (don't you just love those Joann's coupons?)
 While I was at Joann's, I discovered the easiest way I have ever found to hang curtains. They are called 'decorative clip rings'. Sorry, I didn't think to take a pic of them until after they were already hung at the top of the 80 inch window and my husband was fast asleep. I don't think he would have appreciated me waking him so he could take down the curtain for me to snap a picture of the clip.
This little ingenious creation allows you to simply hem all four sides of the curtain. After hemming, add the clips and slide onto a tension rod and you are ready to hang your curtains. You can use any rod that is small enough for the clips to slide over (they are made with varying diameters) but I used the inexpensive (read cheap) tension rods from the dollar store. And here is the final product. Please ignore my dining room chair that has a hole in the back of it. All I can say is I am glad it was a chair that the baseball hit and not a window.

My dining room has all of the colors in this fabric and the pattern matches with the rug already in the room. I paid $35 including tax for 6 1/2 yards - I had a coupon (don't you just love those Joann's coupons?)While I was at Joann's, I discovered the easiest way I have ever found to hang curtains. They are called 'decorative clip rings'. Sorry, I didn't think to take a pic of them until after they were already hung at the top of the 80 inch window and my husband was fast asleep. I don't think he would have appreciated me waking him so he could take down the curtain for me to snap a picture of the clip. This little ingenious creation allows you to simply hem all four sides of the curtain. After hemming, add the clips and slide onto a tension rod and you are ready to hang your curtains. You can use any rod that is small enough for the clips to slide over (they are made with varying diameters) but I used the inexpensive (read cheap) tension rods from the dollar store. And here is the final product. Please ignore my dining room chair that has a hole in the back of it. All I can say is I am glad it was a chair that the baseball hit and not a window.
Monday, January 30, 2012
Baby Giraffe Hat and Diaper Cover - Newborn

Is this not adorable? I don't have a clue how to crochet but this sure makes me want to try! I don't even have any little ones (my son is six years old) but this is so precious I had to share! The link to where I found it is located below if you want more information:
Sunday, January 29, 2012
Valentine Tree - table decoration


6 wire coat hangers (all the same size)
Handful of tie straps (your husband has some, trust me - just ask him)
2 strands of garland (6 feet each) of your choice
My coathangers are 16 inches long but you can use any size wire hanger as long as they are all the same length.


I couldn't resist the urge to take it outside and snap this picture.... all that green called for some red.

Saturday, January 28, 2012
Huge Floor Pillows

Aren't these the most adorable floor pillows? You can find them in the Moda Bake Shop website under Home Decor. If I get brave enough to attempt to make them, I will post pictures.
Subscribe to:
Posts (Atom)